
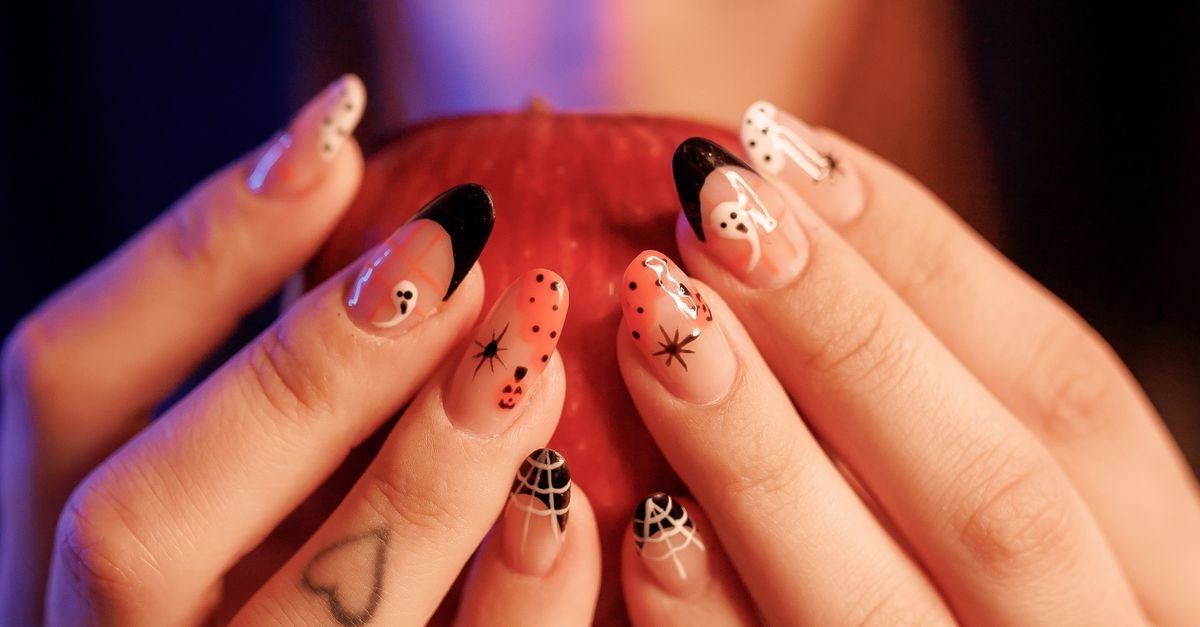
Halloween is the perfect excuse to unleash your creativity, and your nails are the ideal canvas for a hauntingly beautiful transformation.
Whether you prefer eerie spiders, glittering pumpkins, or subtle autumn tones, this ultimate guide walks you through every step from gathering supplies to mastering advanced techniques so you can sport salon‑worthy Halloween nail designs that turn heads at every costume party.
Step 1: Planning Your Halloween Nail Theme

Before you even open a bottle of polish, decide on a cohesive theme. A clear plan saves time, reduces product waste, and ensures your finished look feels intentional rather than random.
Identify Your Inspiration Sources
- Classic horror icons (witches, ghosts, skulls)
- Seasonal symbols (pumpkins, leaves, black cats)
- Color palettes (traditional orange‑black, pastel autumn, neon horror)
- Current trends (glitter gradients, negative space, 3‑D embellishments)
Gather reference images—Pinterest boards, Instagram hashtags (#HalloweenNails, #SpookyManicure), or even screenshots from movies. Create a mood board to visualize how colors and motifs will interact across all ten nails.
Choose a Practical Color Scheme
A balanced palette typically includes a base, an accent, and a highlight. For Halloween, a classic combo is deep matte black, vibrant orange, and a glittery silver or gold for sparkle. If you want something subtler, try charcoal gray paired with muted rust and a touch of iridescent pearl.
Step 2: Assembling Your Nail Toolkit

Having the right tools on hand makes the process smoother and reduces the risk of smudges or uneven layers.
Essential Supplies
- Base coat and top coat (preferably quick‑dry, chip‑resistant)
- Matte black polish, orange polish, and a metallic or glitter top coat
- Fine‑tip nail art brushes (0.25 mm and 0.5 mm)
- Dotting tools for precise spots
- Striping tape or nail stencils for clean lines
- UV/LED lamp (if using gel polish)
- Cuticle oil and hand cream for prep and aftercare
- Optional 3‑D elements: tiny spiders, rhinestones, or foil pieces
Choosing Between Acrylic, Gel, or Regular Polish
Each medium has pros and cons for Halloween designs:
| Medium | Durability | Ease of Removal | Best For |
|---|---|---|---|
| Acrylic | High (up to 3 weeks) | Requires acetone soak | Thick 3‑D elements, heavy glitter |
| Gel | Medium‑High (2‑3 weeks) | UV lamp removal | Glossy finishes, precise lines |
| Regular Polish | Low (5‑7 days) | Simple nail polish remover | Quick experiments, budget‑friendly |
Step 3: Preparing Your Nails for a Flawless Canvas

Proper preparation is the secret behind long‑lasting nail art. Skipping this step often leads to premature chipping or uneven colors.
Cleaning and Shaping
- Remove any existing polish with acetone.
- File nails to your desired shape—almond, coffin, or classic square work well for Halloween designs.
- Buff the surface lightly to smooth ridges; this helps polish adhere.
Cuticle Care and Base Coating
Push back cuticles gently with a cuticle pusher, then apply a nourishing cuticle oil. Once the oil absorbs, apply a thin layer of base coat and cure (if using gel) or let dry completely. The base coat prevents staining from dark pigments like black or deep purple.
Step 4: Laying Down the Base Colors

The base layers set the stage for your detailed artwork. A smooth, even foundation ensures your designs pop.
Creating a Gradient or Ombre Background
If you want a gradient from black to orange, follow these steps:
- Paint the entire nail with matte black polish. Allow it to dry 2‑3 minutes.
- Using a makeup sponge, dab a small amount of orange polish onto the tip of the sponge.
- Press the sponge lightly onto the nail, blending the orange into the black. Repeat until you achieve a seamless fade.
- Seal with a thin matte top coat to lock in the gradient.
Solid Base for Detailed Designs
For intricate patterns (spiders, skulls), a solid base works best. Apply two thin coats of your chosen base color—black for a dramatic look or deep burgundy for a vintage vibe—allowing each coat to dry fully before moving on.
Step 5: Adding Signature Halloween Motifs

Now the fun begins. Choose 2‑3 signature motifs and repeat them across the nails for consistency, while varying placement for visual interest.
Classic Spider Webs
- Apply striping tape in a criss‑cross pattern across the nail.
- Using a fine‑tip brush, paint over the tape with white or silver polish.
- Remove the tape while the polish is still tacky for crisp lines.
- Dot a tiny black dot in the center of each web to mimic a spider body.
Pumpkin Faces
Use a thin orange base and draw a simple jack‑o‑lantern face with a black brush. Keep the design minimal—just a few triangles for teeth and a curved smile—to maintain clarity on smaller nail real estate.
Gothic Skulls
On a matte black nail, paint a white skull outline with a 0.25 mm brush. Fill in eye sockets with a deep gray and add subtle shading using a light hand of silver polish for a metallic sheen.
Step 6: Incorporating Texture and 3‑D Elements
Textures add depth and make your manicure stand out in dim lighting—perfect for Halloween parties.
Glitter Gradients
Apply a glitter top coat over a matte base. For a gradient effect, dab a small amount of glitter polish on a sponge and blend from the cuticle down to the tip, leaving more concentration near the tip for a sparkling tip effect.
3‑D Embellishments
- Pick a nail (usually the ring finger) to be the focal point.
- n
- Apply a small dab of clear gel or nail glue.
- Place a tiny spider or rhinestone onto the wet surface.
- Seal with a thick top coat to prevent the embellishment from catching on fabrics.
Matte vs. Gloss Finishes
Mixing finishes creates contrast. Use a matte top coat on background nails and a glossy top coat on accent nails with 3‑D elements. The juxtaposition amplifies the spooky vibe.
Step 7: Perfecting the Finish and Ensuring Longevity
A flawless finish not only looks professional but also protects your art from chips during trick‑or‑treat runs.
Sealing Your Design
Apply a final high‑gloss top coat over the entire nail. If you used a matte base, the glossy top coat will give a subtle sheen while still preserving the matte texture underneath. Cure for gel or let air‑dry for regular polish.
Quick‑Dry Hacks
- Use a fast‑dry spray or a LED lamp for a 30‑second cure.
- Dip nails in cold water for 30 seconds after the top coat dries to set the polish.
Aftercare Tips
Massage cuticle oil daily to keep nails flexible and prevent lifting. Avoid using nails as tools for opening packages, as this can chip the design.
Step 8: Showcasing Your Halloween Nails
Now that your nails are ready, capture them in a way that highlights every spooky detail.
Lighting and Photography
- Use natural daylight or a soft ring light to avoid harsh shadows.
- Position the hand at a slight angle to showcase the gradient and 3‑D elements.
- Zoom in on the focal nail to emphasize texture.
Sharing on Social Media
Tag relevant hashtags (#HalloweenNailArt, #SpookyManicure) and mention any brands you used. Engaging captions like “Ready to haunt the night with these creepy-cute nails!” boost visibility.
Quick Spooky Nail Facts
- Black nail polish was first patented in 1932, making it a timeless Halloween staple.
- Glitter was originally invented for military camouflage before becoming a beauty trend.
- The average lifespan of a well‑sealed Halloween manicure is 10‑14 days, even with frequent hand washing.
- Using a matte top coat reduces the appearance of smudges on dark colors by up to 30%.
- 3‑D nail embellishments can increase the perceived size of your nails by up to 15%.
Frequently Asked Questions
Can I do these designs with regular polish instead of gel?
Yes. All steps listed work with regular polish; just allow extra drying time between layers and use a quick‑dry top coat to prevent smudging.
How can I prevent orange polish from staining my nails?
Apply a thin base coat and let it cure fully. Using a high‑quality, non‑staining orange pigment also reduces discoloration.
What’s the best way to remove glitter without ruining the design underneath?
Soak a cotton pad in nail polish remover, place it over the glittered nail, and wrap with foil for 5‑7 minutes. The glitter will lift, leaving the base polish intact.
Do I need a UV lamp for the 3‑D elements?
If you use gel glue or gel polish for the embellishments, a UV/LED lamp is recommended to cure the glue quickly. For acrylic glue, no lamp is needed.
How long should I wait before applying a second coat of base color?
Wait until the first coat is tacky but not fully dry—about 2‑3 minutes for regular polish, or a 10‑second cure for gel.
Can I reuse 3‑D decorations for next year’s Halloween nails?
p>Yes. Carefully remove them with a cuticle pusher and store in a small airtight container. Clean any residual glue with a nail brush and acetone before reuse.
Final Thoughts
Creating show‑stopping Halloween nail designs is a blend of planning, technique, and a dash of daring creativity. By following this step‑by‑step guide choosing a theme, gathering the right tools, mastering base layers, adding iconic motifs, and sealing everything for durability you’ll be ready to flaunt nails that are as unforgettable as the night itself.
Whether you’re heading to a costume party, a haunted house, or just want to add a spooky flair to everyday life, these designs prove that a little nail art can make a big, eerie impact. Happy haunting, and may your nails stay flawless until the final candle burns out!

Hi, I’m Emily Carter, the mind and heart behind CaptionMood — a creative space designed to help you express your thoughts with the perfect words.
As a writer and digital content enthusiast, I’ve always believed that captions are more than just text; they’re emotions, stories, and reflections of who we are. With CaptionMood, my mission is to provide unique and engaging Mood Captions, Occasion Captions, and Social Media Captions that resonate with people from all walks of life.
Thank you for visiting and being part of this journey. Through CaptionMood, I hope to inspire, connect, and make every post more meaningful.